
vue
vue 是一个渐进式前端框架,是最热门的前端框架之一。 本文是对 vue 官网的 guide 内容的总结,版本为目前的默认版本 vue3。
Essential
Application & Component Instances
每一个 vue app 开始于创建 application instance.它可以注册一些全局的量被 components 使用:
const app = Vue.createApp({ option });
app.component("SearchInput", SearchInputComponent);
app.directive("focus", FocusDirective);
app.use(LocalePlugin);

//因为它们都返回相同的instance,故可以链接起来
Vue.createApp({ option })
  .component("SearchInput", SearchInputComponent)
  .directive("focus", FocusDirective)
  .use(LocalePlugin);
其中的 option 用于设置root component,它是所有其他 component 的父 component. 然后需要mount来生成 dom element:
const RootComponent = {
  /* options */
};
const app = Vue.createApp(RootComponent);
const vm = app.mount("#app");
其中 vm 为root component,与其他 app 的 method 返回值相异. 每个 component 都有自己的component instance,分享同一个application instance,一个例子:
Root Component
└─ TodoList
   ├─ TodoItem
   │  ├─ DeleteTodoButton
   │  └─ EditTodoButton
   └─ TodoListFooter
      ├─ ClearTodosButton
      └─ TodoListStatistics
注意root component在各方面与其他的 component 没有本质的区别. component 有许多的 properties:
const app = Vue.createApp({
  data() {
    return { count: 4 };
  },
});

const vm = app.mount("#app");

console.log(vm.count); // => 4
其中data的内容会通过component instance暴露以被其他的函数等调用. vue 还有一些默认内容的 properties 可以通过component instance访问,如$emit,它们通过$显示.
lifestyle hook
每个component instance创建时会经过一系列的步骤,我们可以通过lifecycle hooks(函数)来在一些特定的阶段运行自己的代码:
Vue.createApp({
  data() {
    return { count: 1 };
  },
  created() {
    // `this` points to the vm instance
    console.log("count is: " + this.count); // => "count is: 1"
  },
});
注意不能使用arrow function,它不能使用this. 在 setup 中注册必须是在同步代码中注册. 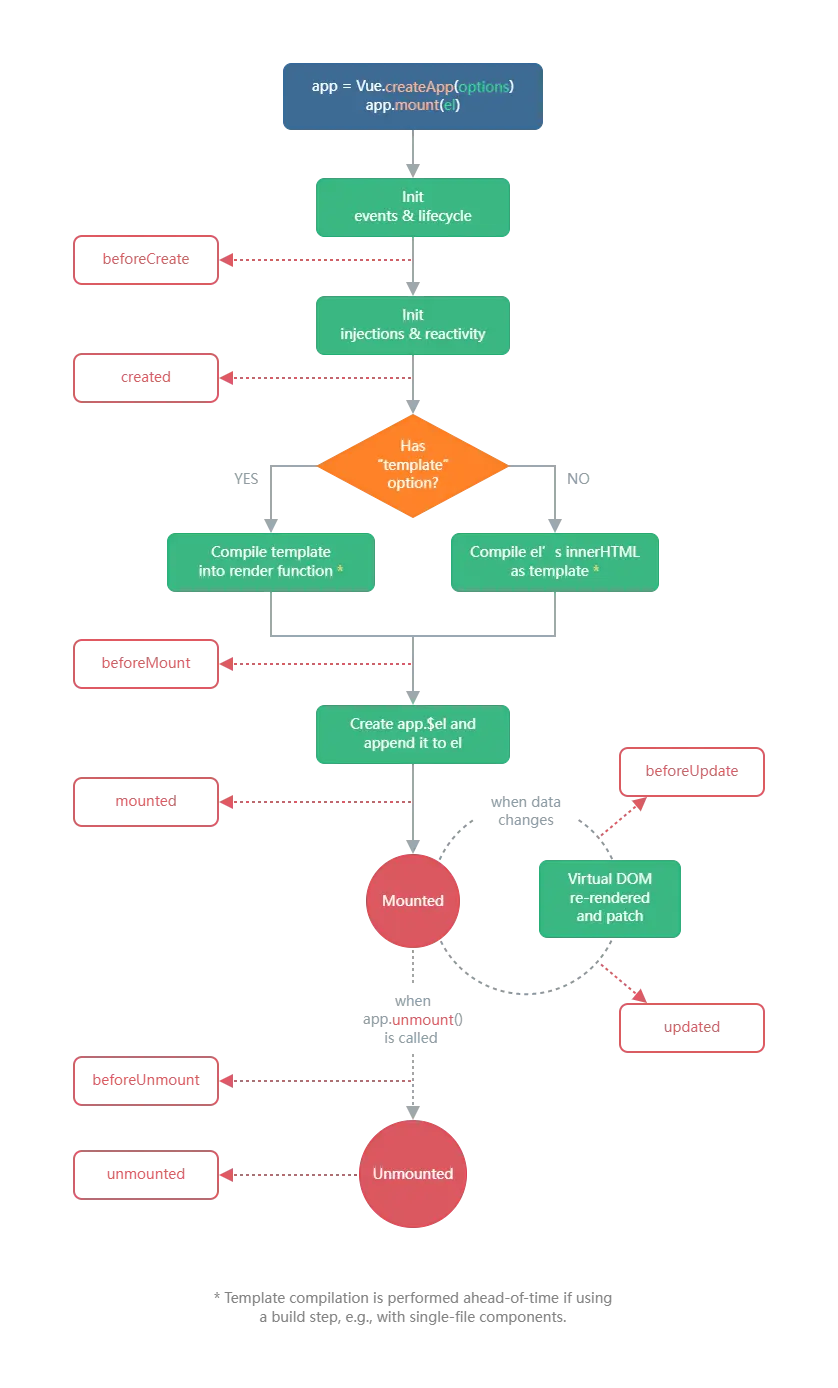
Template Syntax
vue 使用 html 加上一些模板语法来使用component instance的数据. 简单的例子:
<span>Message: {{ msg }}</span>
这样就可以使用 msg property 的值了,它会自动更新,如果不想更新的话:
<span v-once>This will never change: {{ msg }}</span>
注意它支持 js 语句,但只支持one single expression,如果是如定义变量或控制语句则不会起作用. 如果我们想让字符串作为 html 显示:
<p>
  Using v-html directive: <span v-html="rawHtml"></span>
</p>
注意 v-html 的值不可用使用模板语法. 利用值设置 attributes:
<div v-bind:id="dynamicId"></div>
此时如果值存在则会产生对应的 attribute,如果是null或undefined则会不产生. 如果该 attribute 是 Boolean 类型的则有所不同,""会被识别为False,其他仍一样. 上面用到的许多v-开头的 attributes 是 vue 引入的特殊 attributes,称为directives.它们的值会被识别为 js 语句. 它们可以带 argument:
<a v-bind:href="url"> ... </a>
argument可以使用 js 语句:
<a v-bind:[attributeName]="url"> ... </a>
modifiers则用于让 directive 执行一些特殊的操作:
<form v-on:submit.prevent="onSubmit">...</form>
如上面的语句防止 form 发送表单. 对于常用的v-bind,v-on,可以使用 shorthand 简化书写:
<!-- shorthand v-bind-->
<a :href="url"> ... </a>

<!-- shorthand v-on-->
<a @click="doSomething"> ... </a>
上述的 attribute 有一些性质:
- 期望它们的值是 string,如果是 null 会被移除,如果是其他类型的会发出警告.
- 表达式有语法限制,如不能有空格和引号,推荐使用 computed.
- 表达式只可访问少量的初始 globals
在.html 文件中的称为Dom template,在.vue 文件或template属性后的叫string template.
Data Properties and Methods
vue 通过data为 component instance 添加数据:
const app = Vue.createApp({
  data() {
    return { count: 4 };
  },
});
const vm = app.mount("#app");
它可以被访问和修改:
console.log(vm.$data.count) // => 4
console.log(vm.count)       // => 4

-- Assigning a value to vm.count will also update $data.count
vm.count = 5
注意它只会在 component 产生时添加,要在开始想好所有所需的数据.如果想让某个数据实现,设它的值为null或undefined即可. component instance 添加method:
const app = Vue.createApp({
  data() {
    return { count: 4 };
  },
  methods: {
    increment() {
      // `this` will refer to the component instance
      this.count++;
    },
  },
});
它可以直接访问this,注意不要使用arrow function,这会让它不能使用this. 它可以在template中使用,用在 event listener 或直接调用.注意直接调用应不修改数据,如需要使用lifestyle hook. vue 并不内置Debouncing and Throttling,可以通过 Lodash等库使用:
app.component("save-button", {
  created() {
    // Debouncing with Lodash
    this.debouncedClick = _.debounce(this.click, 500);
  },
  unmounted() {
    // Cancel the timer when the component is removed
    this.debouncedClick.cancel();
  },
  methods: {
    click() {
      // ... respond to click ...
    },
  },
  template: `
    <button @click="debouncedClick">
      Save
    </button>
  `,
});
注意它使用了created来避免多个 component instance 使用同一个 debounced.
Computed Properties and Watchers
当我们需要较为复杂的计算时,我们使用computed properties:
Vue.createApp({
  data() {
    return {
      author: {
        name: "John Doe",
        books: [
          "Vue 2 - Advanced Guide",
          "Vue 3 - Basic Guide",
          "Vue 4 - The Mystery",
        ],
      },
    };
  },
  computed: {
    // a computed getter
    publishedBooksMessage() {
      // `this` points to the vm instance
      return this.author.books.length > 0 ? "Yes" : "No";
    },
  },
}).mount("#computed-basics");
它于一般的 method 的区别是它有缓存机制,只会在依赖的数据改变时进行计算. 默认只能得到值,也可以设置一个setter:
computed: {
  fullName: {
    // getter
    get() {
      return this.firstName + ' ' + this.lastName
    },
    // setter
    set(newValue) {
      const names = newValue.split(' ')
      this.firstName = names[0]
      this.lastName = names[names.length - 1]
    }
  }
}
watchers
有时我们希望当一些 state 改变时执行一些操作(如异步 fetch),此时我们会使用 watcher:
<script setup>
import { ref, watch } from 'vue'

const question = ref('')
const answer = ref('Questions usually contain a question mark. ;-)')

// watch works directly on a ref
watch(question, async (newQuestion, oldQuestion) => {
  if (newQuestion.indexOf('?') > -1) {
    answer.value = 'Thinking...'
    try {
      const res = await fetch('https://yesno.wtf/api')
      answer.value = (await res.json()).answer
    } catch (e) {
      answer.value = 'Error! Could not reach the API. ' + error
    }
  }
})
watch的第一个参数可以是 ref,reactive object,getter function,获知一个多源的数组. 第二个参数即为我们需要执行的操作,作为 callback. 第三个参数是可选设置. 但注意 reactive object 的 property 不能作为第一个参数:
const obj = reactive({ count: 0 });

// this won't work because we are passing a number to watch()
watch(obj.count, (count) => {
  console.log(`count is: ${count}`);
});
作为代替,使用 getter:
watch(
  () => state.someObject,
  () => {
    // fires only when state.someObject is replaced
  }
);
如果我们使用 reactive object 作为第一个参数,watch 会默认跟踪该 obj 的所有 property 的变化.(deep watcher) 但如果是 getter 放回 object,则只会在 getter 返回不同的 object 时执行 callback. 我们可以强制进行 deep watcher:
watch(
  () => state.someObject,
  (newValue, oldValue) => {
    // Note: `newValue` will be equal to `oldValue` here
    // *unless* state.someObject has been replaced
  },
  { deep: true }
);
watch只会在源改变时执行 callback,但有时我们希望指定 watcher 时就执行一次 callback,此时使用watchEffect:
watchEffect(async () => {
  const response = await fetch(url.value);
  data.value = await response.json();
});
它会自动跟踪其中所有的 reactive property,这也是和watch的一个不同之处. watcher callback 会在 DOM 更新之前执行,如果我们想操作 DOM,可以让 callback 在更新后执行:
watch(source, callback, {
  flush: "post",
});

watchEffect(callback, {
  flush: "post",
});
watchPostEffect(() => {}); //和上面的相同
一般我们都会同步创建 watcher,故不需要在意 watcher 的移除,但有时我们异步创建 watcher,此时它不会随 component instance 一起被移除,故我们需要手动去除:
const unwatch = watchEffect(() => {});

// ...later, when no longer needed
unwatch();
Class and Style Bindings
处理 class 和 style 通常需要很麻烦的字符串处理,故 vue 提高了用 object 和 array 处理它们的机制. object:
<div :class="{ active: isActive }"></div>
它会视 isActive 为 bool 变量,true 时添加对应的 class. 我们还可以直接通过data或computed来获得需要的 object:
data() {
  return {
    classObject: {
      active: true,
      'text-danger': false
    }
  }
}
computed: {
  classObject() {
    return {
      active: this.isActive && !this.error,
      'text-danger': this.error && this.error.type === 'fatal'
    }
  }
array:
<div :class="[activeClass, errorClass]"></div>
它依据于下面的数据:
data() {
  return {
    activeClass: 'active',
    errorClass: 'text-danger'
  }
}
style 的处理和 class 的类似.style 还可以提高一个数组的值,如果最后的值浏览器支持则会使用它,不会则会检查其他的值.
<div :style="{ display: ['-webkit-box', '-ms-flexbox', 'flex'] }"></div>
如果相应的 css attribute 需要前缀,vue 会自动检查并添加.
Conditional Rendering
使用v-if来选择性生成对应的 element:
<h1 v-if="awesome">Vue is awesome!</h1>
利用 template 对多个 element 应用:
<template v-if="ok">
  <h1>Title</h1>
  <p>Paragraph 1</p>
  <p>Paragraph 2</p>
</template>
除此之外后面可以家v-else-if和v-else,用法和 js 中的控制语句类似. v-show则总是会生成,不过会利用条件选择性显示:
<h1 v-show="ok">Hello!</h1>
前者在运行时会找出更多损失,后者则是渲染时更多,按需要使用.
List Rendering
我们可以使用v-for来生成多个 element:
<ul id="array-rendering">
  <li v-for="item in items">{{ item.message }}</li>
</ul>
这样就能遍历 array items 里的数据并生成了. 可以添加第二个参数获得index:
<ul id="array-with-index">
  <li v-for="(item, index) in items">
    {{ parentMessage }} - {{ index }} - {{ item.message }}
  </li>
</ul>
处理可以用它遍历数组,还可以用来遍历 object,它会按Object.keys()的顺序遍历,:
<li v-for="(value, name, index) in myObject">
  {{ index }}. {{ name }}: {{ value }}
</li>
上述的in可以替换为of,这个和 js 中的写法类似. 通常我们需要添加key帮助 vue 来标记重复利用生成的 element:
<div v-for="item in items" :key="item.id">
  <!-- content -->
</div>
key 要使用 string 或 number. 默认情况下,当 array 改变时,vue 会让每个 element 保此原顺序并处理改变. 我们可以使用 array 的各种 method 来处理数据.注意如果不修改原数组要用新数组覆盖原数组. 可以遍历一个范围(从 1 开始):
<div id="range" class="demo">
  <span v-for="n in 10" :key="n">{{ n }} </span>
</div>
多个 element 的处理:
<ul>
  <template v-for="item in items" :key="item.msg">
    <li>{{ item.msg }}</li>
    <li class="divider" role="presentation"></li>
  </template>
</ul>
如果嵌套了v-if,v-if会更优先处理:
<li v-for="todo in todos" v-if="!todo.isComplete">{{ todo.name }}</li>
如果想对每一个元素进行判断的话这样书写:
<template v-for="todo in todos" :key="todo.name">
  <li v-if="!todo.isComplete">{{ todo.name }}</li>
</template>
Event Handling
使用v-on或@为事件添加 handler:
<div id="basic-event">
  <button @click="counter += 1">Add 1</button>
  <p>The button above has been clicked {{ counter }} times.</p>
</div>
使用 method:
<div id="event-with-method">
  <!-- `greet` is the name of a method defined below -->
  <button @click="greet">Greet</button>
</div>
调用 method:
<div id="inline-handler">
  <button @click="say('hi')">Say hi</button>
  <button @click="say('what')">Say what</button>
</div>
传event参数:
<button @click="warn('Form cannot be submitted yet.', $event)">Submit</button>
多个 handler:
<button @click="one($event), two($event)">Submit</button>
vue 提供了多个 modifier(通过.使用来进行一些特殊的操作
<!-- the click event's propagation will be stopped -->
<a @click.stop="doThis"></a>

<!-- the submit event will no longer reload the page -->
<form @submit.prevent="onSubmit"></form>

<!-- modifiers can be chained -->
<a @click.stop.prevent="doThat"></a>

<!-- just the modifier -->
<form @submit.prevent></form>

<!-- use capture mode when adding the event listener -->
<!-- i.e. an event targeting an inner element is handled here before being handled by that element -->
<div @click.capture="doThis">...</div>

<!-- only trigger handler if event.target is the element itself -->
<!-- i.e. not from a child element -->
<div @click.self="doThat">...</div>
注意如果链接其他,顺序会影响其功能. 监听键盘的事件也是使用对应的 modifier:
<input @keyup.page-down="onPageDown" />
所有KeyboardEvent.keyz 中的事件都可以使用,不过要转化为kebab-case的形式. 对于常用的,vue 提供了较为方便的 modifier: .enter.tab.delete (captures both "Delete" and "Backspace" keys) .esc.space.up.down.left.right 对于一些系统的控制按钮: .ctrl.alt.shift.meta.meta在不同的键盘指向不同,如 window 的键盘指⊞. .exact用于排除其他的按键的干扰:
<!-- this will fire even if Alt or Shift is also pressed -->
<button @click.ctrl="onClick">A</button>

<!-- this will only fire when Ctrl and no other keys are pressed -->
<button @click.ctrl.exact="onCtrlClick">A</button>

<!-- this will only fire when no system modifiers are pressed -->
<button @click.exact="onClick">A</button>
鼠标的 modifiers: .left.right.middle
Form Input Bindings
我们可以使用v-model来控制和使用input,textarea和select.注意需要在 js 的data中设置初始值,v-model会忽略 html 中的 value 等初始值:
<input v-model="message" placeholder="edit me" />
<p>Message is: {{ message }}</p>
textarea在 template 不能直接使用变量,使用v-model代替:
<!-- bad -->
<textarea>{{ text }}</textarea>

<!-- good -->
<textarea v-model="text"></textarea>
对于select,推荐设置一个空值表示没有选择.因为在 ios 中,如果v-model的值的内容不在option中,会导致用户无法选择第一项(未发出change事件). 对于 radio, checkbox and select options,它们的 value 通常是静态的 string.有时我们想让它们为动态改变的值,使用v-bind:
<input type="radio" v-model="pick" v-bind:value="a" />
checkbox:
<input type="checkbox" v-model="toggle" true-value="yes" false-value="no" />
注意后两个 attribute 不影响原来的 value. option:
<select v-model="selected">
  <!-- inline object literal -->
  <option :value="{ number: 123 }">123</option>
</select>
v-model同样有 modifier: .lazy:原来会在input事件后,现在改为在change事件后. .number:自动转化字符串为数字. .trim:去除首尾空白字符.
Components Basics
component 在 vue 中是可复用的实例,使用前需要注册,注册分为global和local,global对所有 app 里的 component instance 都适用.下面是global的例子:
const app = Vue.createApp({});

// Define a new global component called button-counter
app.component("button-counter", {
  data() {
    return {
      count: 0,
    };
  },
  template: `
    <button @click="count++">
      You clicked me {{ count }} times.
    </button>`,
  //注意想使用这个写法需要开启相关的设置,不然就得使用render函数.
});
使用:
<div id="components-demo">
  <button-counter></button-counter>
  <button-counter></button-counter>
</div>
注意每一个都有自己的component instance. Props可用于传递数据:
app.component("blog-post", {
  props: ["title"],
  template: `<h4>{{ title }}</h4>`,
});
它在内部可以视为一个普通的 component property. 使用:
<blog-post title="My journey with Vue"></blog-post>
在 vue 中,父 element 被设置为可以对子 element 的事件作出响应:
<blog-post ... @enlarge-text="postFontSize += 0.1">
  <button @click="$emit('enlargeText')">Enlarge text</button>
</blog-post>
可以把发出的事件写入emits便于控制:
app.component("blog-post", {
  props: ["title"],
  emits: ["enlargeText"],
});
发送事件可以带值:
<button @click="$emit('enlargeText', 0.1)">Enlarge text</button>
使用:
<blog-post ... @enlarge-text="postFontSize += $event"></blog-post>
在 component 想使用v-model有几种方法. 一是:
<custom-input
  :model-value="searchText"
  @update:model-value="searchText = $event"
></custom-input>
这样需要设置对于的值和事件:
app.component("custom-input", {
  props: ["modelValue"],
  emits: ["update:modelValue"],
  template: `
    <input
      :value="modelValue"
      @input="$emit('update:modelValue', $event.target.value)"
    >
  `,
});
另一种方法是使用computed property:
app.component("custom-input", {
  props: ["modelValue"],
  emits: ["update:modelValue"],
  template: `
    <input v-model="value">
  `,
  computed: {
    value: {
      get() {
        return this.modelValue;
      },
      set(value) {
        this.$emit("update:modelValue", value);
      },
    },
  },
});
想让 component 中间的内容显示,使用slot:
<alert-box> Something bad happened. </alert-box>
这样相关内容就会在slot中显示.
app.component("alert-box", {
  template: `
    <div class="demo-alert-box">
      <strong>Error!</strong>
      <slot></slot>
    </div>
  `,
});
我们可以使用component element的is attribute来让它在多个 component 中变换:
<component :is="currentTabComponent"></component>
这样改变currentTablComponent的值就可以改变它了. 如果我们是在 dom 中直接使用 template,有几点要注意:
1.如
table等 element 不能直接放入 component,使用 is 如<tr is..2.在 js 中使用小驼峰命名法命名的 prop 需要改写,如 postTitle->post-title.
component 使用class:
<div id="app">
  <my-component class="baz"></my-component>
</div>
const app = Vue.createApp({});

app.component("my-component", {
  template: `
    <p :class="$attrs.class">Hi!</p>
    <span>This is a child component</span>
  `,
});
Reactivity Fundamentals
我们可以通过reactive创建一个可以检测变化和读取值的对象或数组:
import { reactive } from "vue";

const state = reactive({ count: 0 });
当值变化时,dom 并不会马上发生变化,而是会缓存起来直到 update cycle 的next tick.这保证了即使多个值发生改变,component 只会更新一次. 我们可以通过nextTick函数来等待 dom 发生更新并进行操作:
import { nextTick } from 'vue'

function increment() {
  count.value++
  nextTick(() => {
    -- access updated DOM
  })//return promise
}
默认情况下,嵌套的对象和数组依然是 reactive 的(deep reactivity). reactive函数返回的是 proxy 对象,故与原对象不相同. 如果我们使用相同源创建,返回同一个 proxy,如果我们使用已存在的 proxy 创建,放回同一个 proxy:
// calling reactive() on the same object returns the same proxy
console.log(reactive(raw) === proxy); // true

// calling reactive() on a proxy returns itself
console.log(reactive(proxy) === proxy); // true
这些规则对于嵌套的对象也成立(deep reactivity 情况下). reactive有一下局限性:
- 只作用与 object types(object,array,collection types).
- 不能轻易替换,有时还会失去 reactive:
let state = reactive({ count: 0 });

// this won't work!
state = reactive({ count: 1 });

// n is a local variable that is disconnected
// from state.count.
let n = state.count;
// does not affect original state
n++;

// count is also disconnected from state.count.
let { count } = state;
// does not affect original state
count++;

// the function receives a plain number and
// won't be able to track changes to state.count
callSomeFunction(state.count);
为了解决上面这些局限,我们使用ref,使用时需要加上.value:
import { ref } from "vue";
const objectRef = ref({ count: 0 });

// this works reactively
objectRef.value = { count: 1 };
const obj = {
  foo: ref(1),
  bar: ref(2),
};

// the function receives a ref
// it needs to access the value via .value but it
// will retain the reactivity connection
callSomeFunction(obj.foo);

// still reactive
const { foo, bar } = obj;
当在 template 中使用时,它会自动 unwrapped,故不需要加上.value:
<script setup>
  import { ref } from "vue";

  const count = ref(0);

  function increment() {
    count.value++;
  }
</script>

<template>
  <button @click="increment">
    {{ count }}
    <!-- no .value needed -->
  </button>
</template>
但这只对顶层的 properties 起效:
const object = { foo: ref(1) }
{{ object.foo }} <!-- does NOT get unwrapped -->
当它作为 reactive object 的 property 时,也会自动 unwrapped(仅 deep reactivity):
const count = ref(0);
const state = reactive({
  count,
});

console.log(state.count); // 0

state.count = 1;
console.log(count.value); // 1
此时可以使用新的 ref 替换旧的 ref:
const otherCount = ref(2);

state.count = otherCount;
console.log(state.count); // 2
// original ref is now disconnected from state.count
console.log(count.value); // 1
在数组或 collections 中,不会发生 unwrapped:
const books = reactive([ref("Vue 3 Guide")]);
// need .value here
console.log(books[0].value);

const map = reactive(new Map([["count", ref(0)]]));
// need .value here
console.log(map.get("count").value);
还有一个实验性的在编译时自动加.value的解决方法:
<script setup>
  let count = $ref(0);

  function increment() {
    // no need for .value
    count++;
  }
</script>

<template>
  <button @click="increment">{{ count }}</button>
</template>
Components In-Depth
Component Registration
命名推荐使用W3C rules即全部为小写,用连字符连接. global registration:
Vue.createApp({...}).component('my-component-name', {
  // ... options ...
})
这种情况下所有子 component 都可以使用它. 如果我们命名为MyComponentName,则my-component-name也可用.但如果在 Dom 中使用则只有后者可用. 有时我们不希望子 component 可用使用注册的 component,此时使用local registration:
const app = Vue.createApp({
  components: {
    "component-a": ComponentA,
    "component-b": ComponentB,
  },
});
ComponentA等指的是对应的设置. 如果使用 ES2015 modules:
import ComponentA from "./ComponentA.vue";

export default {
  components: {
    ComponentA,
  },
  // ...
};
ComponentA 是ComponentA: ComponentA的 shorthand.
prop
正如前面所说,prop 是一系列可以传值给 component 的 properties,通过一个 string array 定义:
props: ["title", "likes", "isPublished", "commentIds", "author"];
它的类型可以是任何,我们通常可以加一些验证(如类型指定):
 props: {
    // Basic type check (`null` and `undefined` values will pass any type validation)
    propA: Number,
    // Multiple possible types
    propB: [String, Number],
    // Required string
    propC: {
      type: String,
      required: true
    },
    // Number with a default value
    propD: {
      type: Number,
      default: 100
    },
    // Object with a default value
    propE: {
      type: Object,
      // Object or array defaults must be returned from
      // a factory function
      default() {
        return { message: 'hello' }
      }
    },
    // Custom validator function
    propF: {
      validator(value) {
        // The value must match one of these strings
        return ['success', 'warning', 'danger'].includes(value)
      }
    },
    // Function with a default value
    propG: {
      type: Function,
      // Unlike object or array default, this is not a factory function - this is a function to serve as a default value
      default() {
        return 'Default function'
      }
    }
  }
注意验证是在created之前,故不可访问 component instance 的属性. 而且里面的 type 可以是某个构造函数:
function Person(firstName, lastName) {
  this.firstName = firstName;
  this.lastName = lastName;
}
props: {
  author: Person;
}
如果我们想让某个对象的所有属性都作为 prop 传入,使用不带 argument 的v-bind:
post: {
  id: 1,
  title: 'My Journey with Vue'
}
html 为:
<blog-post v-bind="post"></blog-post>
等同于:
<blog-post v-bind:id="post.id" v-bind:title="post.title"></blog-post>
所有传进去的值,在父 component 相应属性改变时,子 component 的 prop 会改变,但反过来就不会了. 但注意如果是 object 或 array,传进去的是 reference,修改是会改变外部的 property. 我们应该避免在子 component 中修改 prop. 如果需要改变,最好在子 component 内新建一个 computed 或普通的 property 来进行修改. 如果使用 Dom template,注意将 camelCase 转化为 kebab-case.
Non-Prop Attributes
对于我们没有设定为prop的属性,如果调用 component 是传入了,分两种情况: 若 component 只有一个 root node,那它们会自动传为它. 我们可以设置关闭:
app.component("date-picker", {
  inheritAttrs: false,
  template: `
    <div class="date-picker">
      <input type="datetime-local" v-bind="$attrs" ->
    </div>
  `,
});
注意若是 event handler,传给 root node 对 child node 的事件也会做出响应. 我们还可以通过$attrs和v-bind来访问:
app.component("date-picker", {
  inheritAttrs: false,
  template: `
    <div class="date-picker">
      <input type="datetime-local" v-bind="$attrs" ->
    </div>
  `,
});
这样它们会传给 component 中某个特定的 element 了,注意是所有 non-prop 属性. 如果 component 有多个 root node,它不会自动继承,只能通过$attris访问. 可以通过:class="$attrs.class"等语句访问特定的 attribute.
Custom Events
关于event的命名,和 prop 的命名类似,它会自动让 camelCase 的命名对应的 kebab-case 的命名有效,且在 dom template 中只有后者有效. 事件会被发送到外围的 component,故可为该 component 添加 listener:
<template>
  <hello-world @a="t++"></hello-world
  ><!--emit event inside-->

  <p>{{ t }}</p>
</template>
正如前面所说,我们可以通过$emit发送事件并通过emits列出所有事件:
app.component("custom-form", {
  emits: ["inFocus", "submit"],
});
注意事件名和原生的事件冲突,我们新建立的会覆盖原生的. 我们可以通过类似 prop 的方法为事件提供验证:
app.component('custom-form', {
  emits: {
    // No validation
    click: null,

    -- Validate submit event
    submit: ({ email, password }) => {
      if (email && password) {
        return true
      } else {
        console.warn('Invalid submit event payload!')
        return false
      }
    }
  },
  methods: {
    submitForm(email, password) {
      this.$emit('submit', { email, password })
    }
  }
})
我们可以使用待参数使用v-model:
<my-component v-model:title="bookTitle"></my-component>
任何需要添加响应的 prop 和事件:
app.component("my-component", {
  props: {
    title: String,
  },
  emits: ["update:title"],
  template: `
    <input
      type="text"
      :value="title"
      @input="$emit('update:title', $event.target.value)">
  `,
});
通过这种做法我们可以轻松使用v-model绑定 component 的多个变量. 如果我们想要创建自己的modifier:
const app = Vue.createApp({
  data() {
    return {
      myText: "",
    };
  },
});

app.component("my-component", {
  props: {
    modelValue: String,
    modelModifiers: {
      default: () => ({}),
    },
  },
  emits: ["update:modelValue"],
  methods: {
    emitValue(e) {
      let value = e.target.value;
      if (this.modelModifiers.capitalize) {
        value = value.charAt(0).toUpperCase() + value.slice(1);
      }
      this.$emit("update:modelValue", value);
    },
  },
  template: `<input
    type="text"
    :value="modelValue"
    @input="emitValue">`,
});

app.mount("#app");
当生成 component instance 后,我们modelModifiers里会有我们使用了的 modifier 并被设为true,任何我们就可以通过 method 进行相关的处理了. 如果v-model带了参数,那 prop 的名字应为arg + "Modifiers".
Slots
正如我们在前面所说,如果我们想要我们的 component 可以包裹内容,使用slot:
<button class="btn-primary">
  <slot></slot>
</button>
这样包裹的内容就会出现在slot中了. 即使是 html 内容也会进行想要的渲染. 如果在slot中放入内容,则它们会在没有内容送进来时显示. 我们可以有多个 slot,不过需要指定name:
<div class="container">
  <header>
    <slot name="header"></slot>
  </header>
  <main>
    <slot></slot>
  </main>
  <footer>
    <slot name="footer"></slot>
  </footer>
</div>
没有name的为 default. 使用时需要利用v-slot:
<base-layout>
  <template v-slot:header>
    <h1>Here might be a page title</h1>
  </template>

  <template v-slot:default>
    <p>A paragraph for the main content.</p>
    <p>And another one.</p>
  </template>

  <template v-slot:footer>
    <p>Here's some contact info</p>
  </template>
</base-layout>
如果我们只需要default,有较短的写法:
<todo-list v-slot:default="slotProps">
  <i class="fas fa-check"></i>
  <span class="green">{{ slotProps.item }}</span>
</todo-list>
甚至可以不带 argument:
<todo-list v-slot="slotProps">
  <i class="fas fa-check"></i>
  <span class="green">{{ slotProps.item }}</span>
</todo-list>
但注意这种情况下绝对不能使用其他的有name的 slot. 当我们想使用数据时:
<todo-button> Delete a {{ item.name }} </todo-button>
此时只能访问到当前 component 的数据,不能访问 todoButton 的数据. 当然,有办法可以访问到:
<ul>
  <li v-for="( item, index ) in items">
    <slot :item="item"></slot>
  </li>
</ul>
我们可以使用v-bind绑定任意数量的变量,它们叫做slot props 使用时需要 slot props 的名字
<todo-list>
  <template v-slot:default="slotProps">
    <i class="fas fa-check"></i>
    <span class="green">{{ slotProps.item }}</span>
  </template>
</todo-list>
例子里叫 slotProps,其实名字是任意的. 我们可以使用ES2015 destructuring:
<todo-list v-slot="{ item }">
  <i class="fas fa-check"></i>
  <span class="green">{{ item }}</span>
</todo-list>
这种情况下 slot props 的 item 会被赋值给 item. 可以重命名:
<todo-list v-slot="{ item: todo }">
  <i class="fas fa-check"></i>
  <span class="green">{{ todo }}</span>
</todo-list>
提供 fallback(不存在相应的 slot prop 时):
<todo-list v-slot="{ item = 'Placeholder' }">
  <i class="fas fa-check"></i>
  <span class="green">{{ item }}</span>
</todo-list>
v-slot支持Dynamic directive arguments. v-slot有一个 shorthand#仅在带参数时可使用:
<todo-list #default="{ item }">
  <i class="fas fa-check"></i>
  <span class="green">{{ item }}</span>
</todo-list>
Provide / inject
当想把某个数据传给深处的子 component 时,使用prop显得极为麻烦,这个时候我们使用provide/inject,父 component provide 数据,子 component inject 数据:
const app = Vue.createApp({});

app.component("todo-list", {
  data() {
    return {
      todos: ["Feed a cat", "Buy tickets"],
    };
  },
  provide: {
    user: "John Doe",
  },
  template: `
    <div>
      {{ todos.length }}
      <!-- rest of the template -->
    </div>
  `,
});

app.component("todo-list-statistics", {
  inject: ["user"],
  created() {
    console.log(`Injected property: ${this.user}`); // > Injected property: John Doe
  },
});
注意如果我们想使用父 component 的 attributes 时,需要使用 provide 函数:
app.component("todo-list", {
  data() {
    return {
      todos: ["Feed a cat", "Buy tickets"],
    };
  },
  provide() {
    return {
      todoLength: this.todos.length,
    };
  },
  template: `
    ...
  `,
});
但在这种情况下,父 component 的数据改变并不会改变子 component 的数据,此时我们可以使用 Composition API computed来让它们数据相关:
app.component("todo-list", {
  // ...
  provide() {
    return {
      todoLength: Vue.computed(() => this.todos.length),
    };
  },
});

app.component("todo-list-statistics", {
  inject: ["todoLength"],
  created() {
    console.log(`Injected property: ${this.todoLength.value}`); // > Injected property: 5
  },
});
Dynamic & Async Components
我们以前用过is来切换 component:
<component :is="currentTabComponent"></component>
在这种情况下,每次切换都会新建一个 instance,无法保持之前的状态,如果我们想让之前的 instance 被缓存,使用keep-active:
<keep-alive>
  <component :is="currentTabComponent"></component>
</keep-alive>
这样就能保持之前的状态了. 如果我们想异步控制 component 的导入,只在需要时导入,使defineAsyncComponent:
const { createApp, defineAsyncComponent } = Vue;

const app = createApp({});

const AsyncComp = defineAsyncComponent(
  () =>
    new Promise((resolve, reject) => {
      resolve({
        template: "<div>I am async!</div>",
      });
    })
);

app.component("async-example", AsyncComp);
它可以使用 ES2015 的 module 语句,也可以 locally registration. 它会被<Suspense>控制,即视为它有一个该父 component,它的状态被该 component 控制,自己的控制被忽略.可以通过suspensible: false关闭该控制.
Template refs
有时我们想直接在 js 中访问 component 或 element,这个时候使用ref:
<input ref="input" />
使用:
const app = Vue.createApp({});

app.component("base-input", {
  template: `
    <input ref="input" />
  `,
  methods: {
    focusInput() {
      this.$refs.input.focus();
    },
  },
  mounted() {
    this.focusInput();
  },
});
在 setup 中使用一个同名的 ref 来使用:
<script setup>
  import { ref, onMounted } from "vue";

  // declare a ref to hold the element reference
  // the name must match template ref value
  const input = ref(null);

  onMounted(() => {
    input.value.focus();
  });
</script>

<template>
  <input ref="input" />
</template>
注意它默认会是 null,只有在 mounted 后才有具体值.若使用 watcher 需判断是否为 null. 如果使用了 v-for,则 template ref 会是一个数组:
<script setup>
  import { ref, onMounted } from "vue";

  const list = ref([
    /* ... */
  ]);

  const itemRefs = ref([]);

  onMounted(() => console.log(itemRefs.value));
</script>

<template>
  <ul>
    <li v-for="item in list" ref="itemRefs">{{ item }}</li>
  </ul>
</template>
注意新数组的顺序并不保证和源数组相同. template ref 还可以绑定函数,在该函数中,可以访问到所有 element 所在环境的功能:
<input :ref="(el) => { /* assign el to a property or ref */ }" />
<!--当然还可以是method-->
对 component 使用:
<base-input ref="usernameInput"></base-input>
任何在它的父 component:
this.$refs.usernameInput.focusInput();
注意,$refs在 component 渲染完成后才会产生,避免在 template 或 computed property 中使用. 如果使用的是 option API 定义的 component,我们使用 ref 时可以直接访问所有内容. 如果使用的是script setup,只能访问到 expose 的内容.
Handling Edge Cases
有时我们需要处理一些边界情况,这种时候可能需要稍微忽视一些 vue 的一些规则.注意一定不要滥用这些规则. 强制重渲染使用 $forceUpdate,注意它只让当前的 instance 重渲染,子 component 并不会. 让一些静态内容只渲染一次然后缓存使用v-once:
app.component("terms-of-service", {
  template: `
    <div v-once>
      <h1>Terms of Service</h1>
      ... a lot of static content ...
    </div>
  `,
});
Async Components
在大型应用中,我们可能需要仅在必须的时候从服务器加载 component,此时我们可以使用异步 component:
import { defineAsyncComponent } from "vue";

const AsyncComp = defineAsyncComponent(() => {
  return new Promise((resolve, reject) => {
    // ...load component from server
    resolve(/* loaded component */);
  });
});
它接受一个返回 promise 的 loader 函数. import 放回 promise,故通常和它一起使用:
import { defineAsyncComponent } from "vue";

const AsyncComp = defineAsyncComponent(() =>
  import("./components/MyComponent.vue")
);
返回值是一个 component,它只会在被渲染出现时呼叫 loader 函数. 处理各种状态:
const AsyncComp = defineAsyncComponent({
  // the loader function
  loader: () => import("./Foo.vue"),

  // A component to use while the async component is loading
  loadingComponent: LoadingComponent,
  // Delay before showing the loading component. Default: 200ms.
  delay: 200,

  // A component to use if the load fails
  errorComponent: ErrorComponent,
  // The error component will be displayed if a timeout is
  // provided and exceeded. Default: Infinity.
  timeout: 3000,
});
Composition API
composition API 用于将一系列代码按逻辑组合。
basic
setup函数会在 component instance 形成之前运行,他接受 props 作为参数,返回值在接下来都可用.
export default {
  components: { RepositoriesFilters, RepositoriesSortBy, RepositoriesList },
  props: {
    user: {
      type: String,
      required: true,
    },
  },
  setup(props) {
    console.log(props); // { user: '' }

    return {}; // anything returned here will be available for the rest of the component
  },
  // the "rest" of the component
};
注意其中不能使用this. 上面返回的值不可以修改,我们可以让一些变量在任何时候可修改:
import { ref } from "vue";

const counter = ref(0);
console.log(counter.value);
这样可以通过value来访问到值,且传递的是引用,修改的话在所有地方都起效. 我们可以在setup中使用lifestyle hook:
// src/components/UserRepositories.vue `setup` function
import { fetchUserRepositories } from '@/api/repositories'
import { ref, onMounted } from 'vue'

// in our component
setup (props) {
  const repositories = ref([])
  const getUserRepositories = async () => {
    repositories.value = await fetchUserRepositories(props.user)
  }

  onMounted(getUserRepositories) // on `mounted` call `getUserRepositories`

  return {
    repositories,
    getUserRepositories
  }
}
我们还可以使用watch函数来设置watch:
import { ref, watch } from "vue";

const counter = ref(0);
watch(counter, (newValue, oldValue) => {
  console.log("The new counter value is: " + counter.value);
});
它有三个参数:
- 想要 watch 的 Reactive Reference 或 getter function
- callback
- 可选的设置 我们还可以使用
computed函数设置computed,它返回只读的 ref:
import { ref, computed } from "vue";

const counter = ref(0);
const twiceTheCounter = computed(() => counter.value * 2);

counter.value++;
console.log(counter.value); // 1
console.log(twiceTheCounter.value); // 2
我们还可以进一步细分,将相关的内容放入不同的文件再引入.
Reusability
Composables
composables为一类使用 composition API 处理 state logic 的函数. 例子(处理鼠标移动):
// mouse.js
import { ref, onMounted, onUnmounted } from 'vue'

// by convention, composable function names start with "use"
export function useMouse() {
  // state encapsulated and managed by the composable
  const x = ref(0)
  const y = ref(0)

  -- a composable can update its managed state over time.
  function update(event) {
    x.value = event.pageX
    y.value = event.pageY
  }

  // a composable can also hook into its owner component's
  // lifecycle to setup and teardown side effects.
  onMounted(() => window.addEventListener('mousemove', update))
  onUnmounted(() => window.removeEventListener('mousemove', update))

  // expose managed state as return value
  return { x, y }
}
除此之外我们还可以使用 watcher 来处理. 命名规范为 camelCase,use 开头. 返回值一般为ref,理由是可以使用 destruction 语法. 如果我们使用了一些side Effect,注意:
- 如果使用了 SSR,确保使用了 DOM 的 side Effect 在
onMounted等 lifestylehook 中,这是因为它们在浏览器中调用,可以确保访问到 DOM. - 确保在
onUnmounted中清除 side Effects.composables必须只在script setup或 setup 函数中调用.有时也可以在 onMounted 中调用.理由如下: - 可以注册 lifestyle hook
- computed 和 watcher 可以随 component instance 移除.
Custom Directives
我们可以自己设计 directive,这一般是为了复用一些直接访问 dom 的代码:
<script setup>
  // enables v-focus in templates
  const vFocus = {
    mounted: (el) => el.focus(),
  };
</script>

<template>
  <input v-focus />
</template>
在script setup中,所有以 v 开头的 camelCase 格式命名的变量都可以作为 directive 使用.它的值是一些列 lifestyle hook 函数. 通过 option object 注册:
export default {
  setup() {
    /*...*/
  },
  directives: {
    // enables v-focus in template
    focus: {
      /* ... */
    },
  },
};
全局注册:
const app = createApp({});

// make v-focus usable in all components
app.directive("focus", {
  /* ... */
});
可用的 hook:
const myDir = {
  // called before bound element's attributes
  // or event listeners are applied
  created(el, binding, vnode, prevVnode) {
    // see below for details on arguments
  },
  // called right before the element is inserted into the DOM.
  beforeMount() {},
  // called when the bound element's parent component
  // and all its children are mounted.
  mounted() {},
  -- called before the parent component is updated
  beforeUpdate() {},
  // called after the parent component and
  -- all of its children have updated
  updated() {},
  // called before the parent component is unmounted
  beforeUnmount() {},
  // called when the parent component is unmounted
  unmounted() {}
  }
}
参数:
el: 使用该 directive 的 element.binding:包含如下 properties 的对象:value: 传给 directive 的值oldValue: The previous value, only available inbeforeUpdateandupdated. It is available whether or not the value has changed.arg: 传给 directive 的 argumentmodifiers: 包含 modifiers 的对象, 若 directive 使用如此v-my-directive.foo.bar,则它会为{ foo: true, bar: true }.instance: The instance of the component where the directive is used.dir: the directive definition object.
vnode: the underlying VNode representing the bound element.prevNode: the VNode representing the bound element from the previous render. Only available in thebeforeUpdateandupdatedhooks. 如果我们只需要使用mounted和updated,我们可以使用一个函数来注册:
app.directive('color', (el, binding) => {
  -- this will be called for both `mounted` and `updated`
  el.style.color = binding.value
})
如果注册的 directive 使用在 component 上,则会传为 component 的 root element,若有多个,它会被忽略并直接报错. 一般不推荐给 component 使用自己设计的 directive.
plugins
plugins为一些为整个 app 所使用的功能,一般用于注册多个 components 或 directive,或进行一些全局操作. 定义:
const myPlugin = {
  install(app, options) {
    // configure the app
  },
};
//也可以定义为一个函数作为install函数本身.
//app为app instance,options为option对象
使用:
import { createApp } from "vue";

const app = createApp({});

app.use(myPlugin, {
  /* optional options */
});
build-in component
Transition
Transition用于为 element 或 component 进出 dom 时添加动画效果,它会在以下三种情况下触发:
- 选择性渲染
v-if - 选择性显示
v-show - 通过
<component>切换 component 当条件满足时:
- 检查有无 css transition 或 animation 应用,有则会在合适的时机自动添加相关的 class.
- 检查有无
Javascript Hook的 listener,有则会在合适的时机调用. - 如果都没有则正常地插入删除 dom element. 注意
transition只支持一个 component 或 element,component 要求必须有一个 root element. 例子:
<template>
  <button @click="show = !show">Toggle</button>
  <Transition>
    <p v-if="show">hello</p>
  </Transition>
</template>

<style>
  /* we will explain what these classes do next! */
  .v-enter-active,
  .v-leave-active {
    transition: opacity 0.5s ease;
  }

  .v-enter-from,
  .v-leave-to {
    opacity: 0;
  }
</style>
相关的 classes: 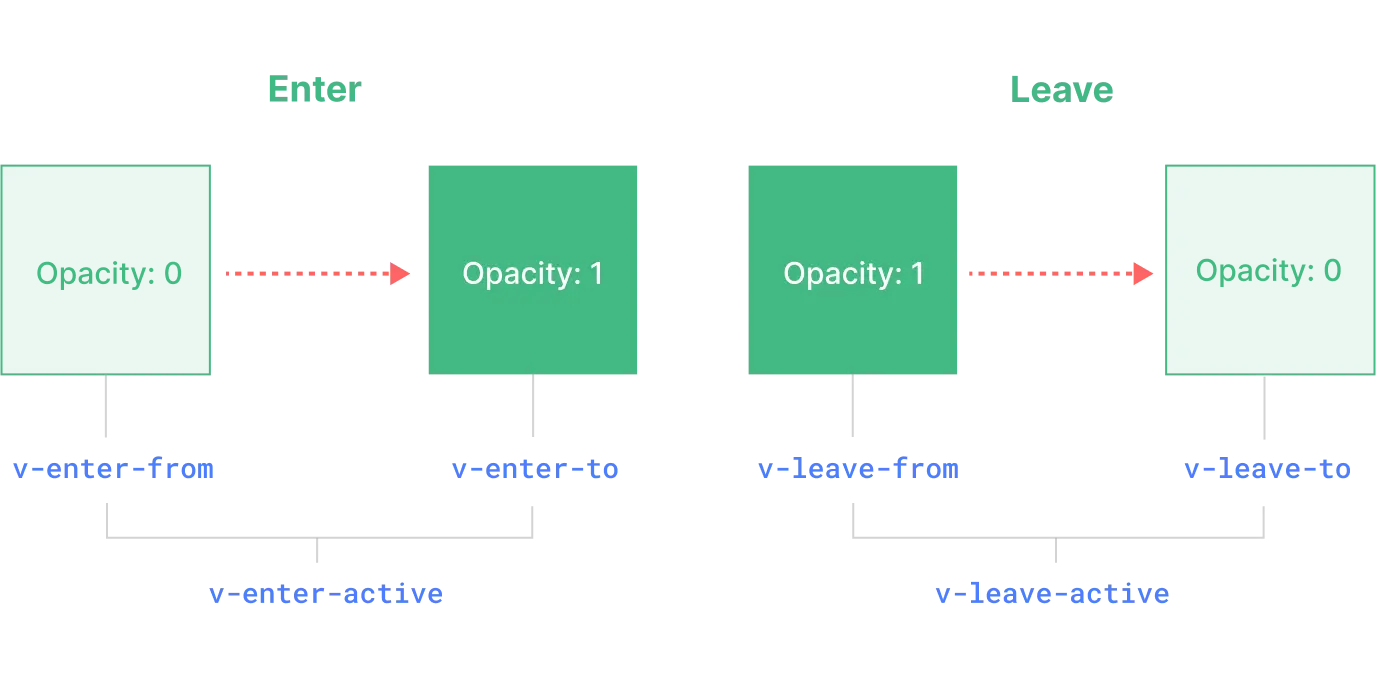 我们可以添加
name:
<Transition name="fade"> ... </Transition>
这样相关的 class 名会改变,如fade-enter-active. name可绑定变量以切换动画效果. 使用 css animation:
.bounce-enter-active {
  animation: bounce-in 0.5s;
}
.bounce-leave-active {
  animation: bounce-in 0.5s reverse;
}
@keyframes bounce-in {
  0% {
    transform: scale(0);
  }
  50% {
    transform: scale(1.25);
  }
  100% {
    transform: scale(1);
  }
}
使用自己的 class 替换原有的 class(用于使用外部的动画库):
<!-- assuming Animate.css is included on the page -->
<Transition
  name="custom-classes"
  enter-active-class="animate__animated animate__tada"
  leave-active-class="animate__animated animate__bounceOutRight"
>
  <p v-if="show">hello</p>
</Transition>
如果我们同时使用了transition和animation,我们需要指定希望 vue 进行操作的部分:
<Transition type="animation">...</Transition>
我们可以为内嵌的 element 也添加动画效果:
/* rules that target nested elements */
.nested-enter-active .inner,
.nested-leave-active .inner {
  transition: all 0.3s ease-in-out;
}

.nested-enter-from .inner,
.nested-leave-to .inner {
  transform: translateX(30px);
  opacity: 0;
}
这种情况下可以指定duration避免出错:
<Transition :duration="550">...</Transition>
<Transition :duration="{ enter: 500, leave: 800 }">...</Transition>
使用动画时最好使用如transform和opacity等 properties.它们不会影响到 layout,效率更高,可通过CSS-Triggers查询会影响 layout 的 properties. 使用JavaScript hook:
<Transition
  @before-enter="onBeforeEnter"
  @enter="onEnter"
  @after-enter="onAfterEnter"
  @enter-cancelled="onEnterCancelled"
  @before-leave="onBeforeLeave"
  @leave="onLeave"
  @after-leave="onAfterLeave"
  @leave-cancelled="onLeaveCancelled"
>
  <!-- ... -->
</Transition>
js:
// called before the element is inserted into the DOM.
// use this to set the "enter-from" state of the element
function onBeforeEnter(el) {},

// called one frame after the element is inserted.
// use this to start the entering animation.
function onEnter(el, done) {
  // call the done callback to indicate transition end
  // optional if used in combination with CSS
  done()
}

// called when the enter transition has finished.
function onAfterEnter(el) {}
function onEnterCancelled(el) {}

// called before the leave hook.
// Most of the time, you should just use the leave hook
function onBeforeLeave(el) {}

// called when the leave transition starts.
// use this to start the leaving animation.
function onLeave(el, done) {
  // call the done callback to indicate transition end
  // optional if used in combination with CSS
  done()
}

// called when the leave transition has finished and the
// element has been removed from the DOM.
function onAfterLeave(el) {}

// only available with v-show transitions
function leaveCancelled(el) {}
注意如果我们只使用 js 动画,最好关闭 css 动画:
<Transition ... :css="false"> ... </Transition>
想创建可重复用的动画效果,新建一个 component,在transition中添加slot即可. 想在加载时就使用动画,使用appear:
<Transition appear> ... </Transition>
通过条件语句为多个 element 进行动画:
<Transition>
  <button v-if="docState === 'saved'">Edit</button>
  <button v-else-if="docState === 'edited'">Save</button>
  <button v-else-if="docState === 'editing'">Cancel</button>
</Transition>
这种情况下因为动画会同时进行,我们不得不把 button 设置为position:absolute来避免 layout 问题,但我们同样可以让动画只会在其他 element 结束时开始:
<Transition mode="out-in"> ... </Transition>
TransitionGroup
TransitionGroup用于对于列表项的增加删除或顺序改变添加动画,于Transition的不同点如下:
- 默认不会添加一个父 element 包裹,可通过
tag添加. - Transition modes不可用.
key必要.- css transition 应用于所有 element. 例子:
<TransitionGroup name="list" tag="ul">
  <li v-for="item in items" :key="item">{{ item }}</li>
</TransitionGroup>
.list-move, /* apply transition to moving elements */
.list-enter-active,
.list-leave-active {
  transition: all 0.5s ease;
}

.list-enter-from,
.list-leave-to {
  opacity: 0;
  transform: translateX(30px);
}

/* ensure leaving items are taken out of layout flow so that moving
   animations can be calculated correctly. */
.list-leave-active {
  position: absolute;
}
注意其中的list-move用于指定表项移动时的动画效果. 使用 js 动画的话可以添加 index 便于操作:
<TransitionGroup
  tag="ul"
  :css="false"
  @before-enter="onBeforeEnter"
  @enter="onEnter"
  @leave="onLeave"
>
  <li v-for="(item, index) in computedList" :key="item.msg" :data-index="index">
    {{ item.msg }}
  </li>
</TransitionGroup>
js
function onEnter(el, done) {
  gsap.to(el, {
    opacity: 1,
    height: "1.6em",
    delay: el.dataset.index * 0.15,
    onComplete: done,
  });
}
keepAlice
此 component 用于缓存 component:
<!-- Inactive components will be cached! -->
<KeepAlive>
  <component :is="activeComponent" />
</KeepAlive>
这样切换 component 时原 component 不会丢失. 默认情况下它会缓存在内的所有 component,我们可以值缓存一部分:
<!-- comma-delimited string -->
<KeepAlive include="a,b">
  <component :is="view"></component>
</KeepAlive>

<!-- regex (use `v-bind`) -->
<KeepAlive :include="/a|b/">
  <component :is="view"></component>
</KeepAlive>

<!-- Array (use `v-bind`) -->
<KeepAlive :include="['a', 'b']">
  <component :is="view"></component>
</KeepAlive>
它会检查 component 的 name 设置,所有相关的 component 必须声明此设置. 我们还可以设置缓存的最大量:
<KeepAlive :max="10">
  <component :is="activeComponent" />
</KeepAlive>
当超过时,访问最少的那一个会被删除以腾出空间. keepAlice 中的 component 可以注册两个特殊的 lifestyle hook:
<script setup>
  import { onActivated, onDeactivated } from "vue";

  onActivated(() => {
    // called on initial mount
    // and every time it is re-inserted from the cache
  });

  onDeactivated(() => {
    // called when removed from the DOM into the cache
    // and also when unmounted
  });
</script>
其中 activated 被作为 cache tree 的一员被插入 dom 时. deactivated 指被移除 dom 但仍在 cache tree 时. 注意在最初的 mount 和最后的 unmount 两者也会被调用. 对 component 中嵌套着的子 component 两个 hook 也能使用.
teleport
本 component 用于 template 传送到所在 component 外的 dom. 使用:
<button @click="open = true">Open Modal</button>

<Teleport to="body">
  <div v-if="open" class="modal">
    <p>Hello from the modal!</p>
    <button @click="open = false">Close</button>
  </div>
</Teleport>
to 的值为 css selector. 虽然它会被传送到外面,但它仍会留一个逻辑 component 在原地,故可视为它仍为所在 component 的一个 component,状态管理等操作不受影响. 它可以按条件取消使用:
<Teleport :disabled="isMobile"> ... </Teleport>
可以传送多个给同个 element:
<Teleport to="#modals">
  <div>A</div>
</Teleport>
<Teleport to="#modals">
  <div>B</div>
</Teleport>
它会按传的顺序的先后依次添加,故结果为:
<div id="modals">
  <div>A</div>
  <div>B</div>
</div>
SFC
SFC Syntax Specification
SFC,即在单个文件编写的 component(.vue),它的基本框架如下:
<template>
  <div class="example">{{ msg }}</div>
</template>

<script>
  export default {
    data() {
      return {
        msg: "Hello world!",
      };
    },
  };
</script>

<style>
  .example {
    color: red;
  }
</style>

<custom1> This could be e.g. documentation for the component. </custom1>
template即 string template,每个 SFC 只能有一个,script 的export default包括的是 component 的 option 对象.它本身如同一个 ES module 被执行.style即 css 代码.custom即各种工具特有的代码. 上述代码块除了style都只能有一个 每个 SFC 可以有一个script setup(可与 script 共存),它会在每个通过 SFC 创建的 component instance 创建时运行. 对于script等还可以使用预处理器,如加入lang='ts'使用 typescript. 它们还可以使用其他文件:
<template src="./template.html"></template>
<style src="./style.css"></style>
<script src="./script.js"></script>
注意使用相对路径用./开头. 至于注释,在具体的代码块使用该块的语言格式的注释,最顶层则使用 html 的注释格式. SFC 会在下列情况自动使用文件名作为 component 的名字:
- Dev warning formatting
- DevTools inspection
- 自我引用.比已经注册了或引入了的 component 优先度低.
script setup
为 setup 函数的语法糖,使用方法如下:
<script setup>
  console.log("hello script setup");
</script>
在其中声明的变量和函数都可在 template 中直接使用,import 进来的也可以直接使用. 若想让其中的变量 reactive,使用 reactive 的相关 API(如 ref). 还可以 import 一个对象代表多个 components 并使用:
<script setup>
  import * as Form from "./form-components";
</script>

<template>
  <Form.Input>
    <Form.Label>label</Form.Label>
  </Form.Input>
</template>
定义 props 和 emits:
<script setup>
  const props = defineProps({
    foo: String,
  });

  const emit = defineEmits(["change", "delete"]);
  const action = (id) => emit("change", id);

  // setup code
</script>
使用 slots 和 attrs:
<script setup>
  import { useSlots, useAttrs } from "vue";

  const slots = useSlots();
  const attrs = useAttrs();
</script>
可以使用await:
<script setup>
  const post = await fetch(`/api/post/1`).then((r) => r.json())
</script>
script setup不可以使用 src,因为它本身依赖于 SFC,使用外来的文件可能会导致问题. 如果有些无法在srcipt setup中定义,可以使用另外一个srcipt进行定义. 默认情况下,script setup的内容无法通过 template ref 或$parent链访问到,使用defineExpose让一些内容可被访问:
<script setup>
  import { ref } from "vue";

  const a = 1;
  const b = ref(2);

  defineExpose({
    a,
    b,
  });
</script>
其中的 ref 会自动 unwrapped.
style
使用 <style scoped>可以让 css 限定在当前的 component 中,不好影响父也不会影响子,但注意父 component 会受到深层次的子 component 的 css 的影响。 如果想影响子 component,使用deep:
<style scoped>
  .a :deep(.b) {
    /* ... */
  }
</style>
使用 v-html 生成的内容不会受到其他 css 内容的影响,但会受到deep的影响. 对于 slot 里面的内容,使用slotted:
<style scoped>
  :slotted(div) {
    color: red;
  }
</style>
想让少量 css 全局使用,使用global:
<style scoped>
  :global(.red) {
    color: red;
  }
</style>
当然,我们也可以直接两个 style 一个有 scoped 一个没有. 注意,使用scoped并不意味着不用使用 class 了,事实上使用 class 会让渲染速度保持正常,而类似p{..}会在scoped变慢. 另一点注意的是如果使用了递归的 component,使用后代规则时要注意,可能会应用到递归的子 component 中. 可以使用<style module>来使用 css module,然后 css 的内容会变成一个一个对象:
<template>
  <p :class="$style.red">This should be red</p>
</template>

<style module>
  .red {
    color: red;
  }
</style>
可以自定义 key 的名字:
<template>
  <p :class="classes.red">red</p>
</template>

<style module="classes">
  .red {
    color: red;
  }
</style>
还可以在 composition API 中使用:
// default, returns classes for <style module>
useCssModule();

// named, returns classes for <style module="classes">
useCssModule("classes");
style 还可以使用变量:
<template>
  <div class="text">hello</div>
</template>

<script>
  export default {
    data() {
      return {
        color: "red",
      };
    },
  };
</script>

<style>
  .text {
    color: v-bind(color);
  }
</style>
最后会通过 inline style 实现动态改变.
typescript
可简单地在把<script>写成<script lang="ts">以开始写 ts,或创建单独的.ts文件,当然这是建立上打包工具正确配置好 ts 的前提下. 注意在 vscode 中,若使用了volar,我们需要关闭内置的 typescript 以使用它的takeover mode.关闭步骤如下:
- ctrl+shift+p 打开命令行输入 show build-in extensions.
- 点击后关闭 typescript features(仅工作区)
- 重启 vscode
composition APIs
当我们定义props,可以通过 runtime declaration 或 type-based declaration 获得 type,即:
<script setup lang="ts">
  const props = defineProps({
    foo: { type: String, required: true },
    bar: Number,
  });

  props.foo; // string
  props.bar; // number | undefined
</script>
或:
<script setup lang="ts">
  const props = defineProps<{
    foo: string;
    bar?: number;
  }>();
</script>
其中 type-based declaration 的 type 可以是 interface.但一定要是同文件下声明的 interface. 当不使用script setup时,必须使用defineComponent来获得 props 的 type:
import { defineComponent } from "vue";

export default defineComponent({
  props: {
    message: String,
  },
  setup(props) {
    props.message; // <-- type: string
  },
});
对于emits,与props一样,可以使用 runtime declaration 或 type declaration,不使用script setup时使用defineComponent. ref会自动根据值获得 type,但如果我们需要的 type 更特殊,使用Ref type:
import { ref, Ref } from "vue";

const year: Ref<string | number> = ref("2020");

year.value = 2020; // ok!
或者传generic argument:
// resulting type: Ref<string | number>
const year = ref<string | number>("2020");

year.value = 2020; // ok!
注意如果我们没有给初始值,则 type 中会包含undefined:
// inferred type: Ref<number | undefined>
const n = ref<number>();
reactive一般也会自动推断出 type,进行 type annotation 我们使用interface:
import { reactive } from "vue";

interface Book {
  title: string;
  year?: number;
}

const book: Book = reactive({ title: "Vue 3 Guide" });
注意不推荐使用generic argument,因为 return type 和generic argument的 type 不同,可能导致处理 nested ref unwrapping 出错. computed会自动根据getter的返回值判断 type,不过我们也可以通过generic进行注释:
const double = computed<number>(() => {
  // type error if this doesn't return a number
});
对于event handlers,推荐注明参数的 type:
function handleChange(event: Event) {
  console.log((event.target as HTMLInputElement).value);
}
对于provide,inject,使用injectionKey(extends symbol)保持 type 同步:
import { provide, inject, InjectionKey } from "vue";

const key = Symbol() as InjectionKey<string>;

provide(key, "foo"); // providing non-string value will result in error

const foo = inject(key); // type of foo: string | undefined
通常将key写于一个单独的 ts 文件中便于引入使用. 当使用string inject key时,变量的 type 会是unknown,需要我们注明:
const key = Symbol() as InjectionKey<string>;

const foo = inject<string>("key"); //foo:unknown
const foo = inject<string>("key"); //foo:string|undefined
注意上面的 type 中有undefined,这是因为不一定能取到值,我们可以通过提供默认值或使用type assertion移除. 当使用template refs时,需要进行 type annotation:
<script setup lang="ts">
import { ref, onMounted } from "vue";

const el = ref<HTMLInputElement | null>(null);

onMounted(() => {
  el.value?.focus();
});
</script>

<template>
  <input ref="el" />
</template>
注意使用值时要进行 type 检查或使用 optional chain,这是因为 value 的值默认是 null,且可能因为 v-if 等保持为 null. 对于component template refs,使用InstanceType获得 type:
<!-- App.vue -->
<script setup lang="ts">
import MyModal from "./MyModal.vue";

const modal = ref<InstanceType<typeof MyModal> | null>(null);

const openModal = () => {
  modal.value?.open();
};
</script>
options APIs
使用props需要使用defineComponent:
import { defineComponent } from "vue";

export default defineComponent({
  // type inference enabled
  props: {
    name: String,
    id: [Number, String],
    msg: { type: String, required: true },
    metadata: null,
  },
  mounted() {
    this.name; // type: string | undefined
    this.id; // type" number | string | undefined
    this.msg; // type: string
    this.metadata; // type: any
  },
});
如果是复杂的 type,使用PropType:
import { defineComponent, PropType } from "vue";

interface Book {
  title: string;
  author: string;
  year: number;
}

export default defineComponent({
  props: {
    book: {
      // provide more specific type to `Object`
      type: Object as PropType<Book>,
      required: true,
    },
    // can also annotate functions
    callback: Function as PropType<(id: number) => void>,
  },
  mounted() {
    this.book.title; // string
    this.book.year; // number

    // TS Error: argument of type 'string' is not
    // assignable to parameter of type 'number'
    this.callback?.("123");
  },
});
因为 ts 的限制,注意使用default和validator等 prop 设置时必须使用 arrow function:
import { defineComponent, PropType } from "vue";

interface Book {
  title: string;
  year?: number;
}

export default defineComponent({
  props: {
    bookA: {
      type: Object as PropType<Book>,
      // Make sure to use arrow functions
      default: () => ({
        title: "Arrow Function Expression",
      }),
      validator: (book: Book) => !!book.title,
    },
  },
});
对于emit,若需要 payload,使用 object 语法可正常推断出 type:
import { defineComponent } from "vue";

export default defineComponent({
  emits: {
    addBook(payload: { bookName: string }) {
      // perform runtime validation
      return payload.bookName.length > 0;
    },
  },
  methods: {
    onSubmit() {
      this.$emit("addBook", {
        bookName: 123, // Type error!
      });

      this.$emit("non-declared-event"); // Type error!
    },
  },
});
对于computed properties,一般能正确根据返回值推断出 type,我们也可以利用函数返回值 type annotation 自己确定 type. 对于event handler,标明Event type:
import { defineComponent } from "vue";

export default defineComponent({
  methods: {
    handleChange(event: Event) {
      console.log((event.target as HTMLInputElement).value);
    },
  },
});
我们可以新增定义 ts 文件并在tsconfig.json中被include增强原有的 vue 的 properties 或 options,注意在其中必须使用 module 语法确保该文件是 module:
import { Route } from "vue-router";

declare module "vue" {
  interface ComponentCustomOptions {
    beforeRouteEnter?(to: Route, from: Route, next: () => void): void;
  }
}
一些 plugins 可能需要这个操作,但一般写的好的库都不需要这个操作.